Using Keybase Webhooks with Civilization VI and Glitch
With the spread of COVID-19 keeping me indoors, one of the things I’ve been doing to pass the time is to play a few games of Civilization VI with friends. Due to everyone having different time commitments we’ve been playing using the Play By Cloud functionality which allows each player to take their game turns asynchronously - that is to say, one person takes their turn, logs off and then it’s synced to the cloud for the next person to log on to take their turn.
The issue here is that there’s no quick way to know when it’s time to take your next turn. Steam does have the ability to send a notification but it’s not ideal if you’re not always at your computer or you don’t have the Steam client running. Thankfully Civilization has a webhook feature available and using it with Glitch we can get turn notifications sent to us on demand right in the Keybase client.
Before you begin #
This guide assumes you have:
- an existing Keybase account
- the Keybase client installed on your local machine
- a copy of Civilization VI and some friends to play with!
Note that there’s a known issue with Civilization VI for macOS v1.0.0.341 where the webhook turn notifications cause the game to crash upon submitting your turn.
See Aspyr’s support article for more details.
Overview #
Let’s get started! Here’s a quick high-level outline of the process we’re going to be working with:
The Civilization VI part is quite straightforward as we essentially have no control over it. The game will provide a JSON object to a webhook endpoint of your choosing that is structured as follows:
{
  "value1": "Civilization Game Name",
  "value2": "Player's Steam Name",
  "value3": "Turn Number"
}
The information we can get is pretty basic but it’s enough to work with. Let’s move onto the next part of the process - Glitch.
Setting up Glitch #
Before we can send notifications to Keybase, we first need a way to translate the data that comes from the Civilization webhook into a format that the Keybase bot can process. There’s lots of complicated ways to host your own webhook service, but an easy and free way to do it is using Glitch. If you’re not familiar with it, you can think of Glitch as a simple cloud-based editor that will host your code for free.
To get started head to glitch.com and create a free account. Once you’re logged in, create a ‘New Project’ and select the hello-express template. This will give you a basic node.js project with the following structure:
project/
├─ assets/
├─ public/
│  ├─ script.js
│  └─ style.css
├─ views/
│  └─ index.html
├─ .env
├─ package.json
├─ README.md
└─ server.js
For our simple project we can ignore most of the template and just focus on the package.json and server.js files.
We first need to set up our project dependencies to provide us with the functionality that we’ll need for our webhook service, so head to the package.json file. Glitch makes it easy to add other packages as you can simply click the ‘Add Package’ button and search for the ones you want. Go ahead and add the request, body-parser and multer packages.
The dependencies section of your file should now look something like the below. Don’t worry if the version numbers aren’t exactly the same as these as yours may be newer. The package should still work, but if you have any trouble, you can change your versions to match mine.
{
  "dependencies": {
    "express": "^4.17.1",
    "request": "^2.88.2",
    "body-parser": "^1.19.0",
    "multer": "^1.4.2"
  }
}
The rest of the package file is used to describe the project, and for this project it’s essentially optional. If you want to though, you can go ahead and give your project a name, version and description by adjusting the defaults. When you’re done your file should look something like this:
{
  "name": "civ6-keybase-bot",
  "version": "0.1.0",
  "description": "Trigger a Keybase @mention from Civilization VI",
  "main": "server.js",
  "scripts": {
    "start": "node server.js"
  },
  "dependencies": {
    "express": "^4.17.1",
    "request": "^2.88.2",
    "body-parser": "^1.19.0",
    "multer": "^1.4.2"
  },
  "engines": {
    "node": "12.x"
  },
  "license": "MIT",
  "keywords": ["node", "express", "keybase"]
}
Now that the project is set up, it’s time to tell it what we want it to do. Essentially we need to receive the JSON object from Civilization VI and extract the data which we will then pass onto the Keybase webhook bot as a new JSON object structured in the format it’s expecting.
Move over to the server.js file. This is the file that is called by the start script in our package and so anything we put in here will be executed when our project runs. For our simple project, we’ll be putting all our logic in here. If you don’t want to go through all this in detail, you can skip to the end of this section and copy the completed file into your project. Let’s get started!
The first thing you’ll see in the template provided are some constants that link to the express library. As we’ve included a few new libraries in our project, we also need to reference these here. Go ahead and add in some new definitions below the ones provided.
const express = require("express");
const app = express();
const bodyParser = require("body-parser");
const request = require("request");
const multer = require("multer");
const upload = multer();
Next, you’ll see that the template has an array called dreams but for our project we don’t need this information. Instead we need to replace this with some objects of our own. Firstly, becuase Civilization provides us with the player’s Steam name, we need a way of mapping this to that player’s Keybase username so that we can @mention them in chat as they may use a different name on each platform.
Replace the entire dreams declaration with a new one for playerMapping:
// Map Steam name to Keybase username
const playerMapping = {
  "Steam Name 1": "keybase_username_1",
  "Steam Name 2": "keybase_username_2",
  "Steam Name x": "keybase_username_x",
};
You’ll also need to replace each Steam Name [n] with the Steam player names in your game and then match them to their corresponding keybase_username_[n]. You can add as many players to this list as you need for your circumstances.
Now that the player names are mapped, we now need a way to map a Civilization game instance to a Keybase channel. Although we could just send all the turn notifications to the same channel, by doing it this way our project will be flexible enough to send turn notifications to different channels for each individual game of Civilization we have in progress.
Below the playerMapping declaration, add a new one for botMapping:
// Map Civilization game name to individual Keybase bots
const botMapping = {
  "Civilization Game 1": "https://KeybaseBotURL_1/",
  "Civilization Game 2": "https://KeybaseBotURL_2/",
};
We don’t have all the information to complete this mapping just yet, so for now leave this as a placeholder and we’ll come back and complete it shortly.
The next thing we have to do is to tell our server to expect a JSON request (as this is what Civilization VI is sending us). We can do this easily by telling our app to use body-parser’s JSON parsing:
// make all the files in 'public' available
app.use(express.static("public"));
app.use(bodyParser.json());
We’re almost there. All that’s left now is to process an incoming request and send it off to Keybase. Let’s deal with the second part of this equation first. Directly after the app.use() calls above, add in a new function called sendMessage():
function sendMessage(botURL, content) {
  request(
    {
      uri: botURL,
      body: { msg: content },
      json: true,
      method: "POST",
    },
    function (error, response, body) {
      if (!error && response.statusCode == 200) {
        console.log(body);
      } else {
        console.log(response.statusCode);
        console.log(body);
      }
    }
  );
}
There’s a couple of things going on here, so let’s step through it. The function expects two pieces of information:
botURL- the URL of the Keybase webhook bot that we will send this message tocontent- the message text that we want to send
The function then starts a POST request to the botURL and in the request body it sends a string msg with the content of our message as a JSON object. Finally, the error function will log requests to the Glitch console so that it’s possible to keep track of the messages that the server is attempting to send.
The final piece of the server logic is to process incoming requests from Civilization VI. As I mentioned in the overview, the game provides a simple JSON object with three values that we can use:
{
  "value1": "Civilization Game Name",
  "value2": "Player's Steam Name",
  "value3": "Turn Number"
}
To receive this object and process it, we need to instruct our app to handle incoming POST requests which we do with the following which is inserted below our sendMessage function:
app.post("/", upload.array(), function (request, response) {
  var gameName = request.body.value1;
  var botURL = botMapping[gameName];
  var keybaseUsername = playerMapping[request.body.value2];
  var turnNumber = request.body.value3;

  if (keybaseUsername && botURL) {
    var message =
      "Hey @" +
      keybaseUsername +
      ", it's time to take turn " +
      turnNumber +
      " in '" +
      gameName +
      "'!";
    sendMessage(botURL, message);
    console.log("Done.");
  } else {
    console.log("Error: missing game or player\n" + request.body);
  }

  response.end();
});
Although it looks like there’s a lot going on here, it’s actually a very simple process so let’s step through it again. Firstly, we need to take the three values we’re receiving value1, value2 and value3 from the game and store them into variables we can use:
gameName-value1from the request, the name of the gamebotURL- takes the game name and uses thebotMappingobject we created earlier to determine the URL of the corresponding Keybase botkeybaseUsername- takes the player’s Steam name fromvalue2of the request and uses theplayerMappingobject we created earlier to determine the Keybase username that should be @mentionedturnNumber-value3from the request, the next turn number
Once we have all this information we format a message string that will be the actual message that is sent to our sendMessage function. You can customise this message however you like but in this example, we’ll send a message that says:
Hey @username, it’s time to take turn 3 in ‘Steam game’!
Once again, if there’s an error we’ll log it to the console so we can track down any issues.
Your server.js file is now complete and should look something like this:
const express = require("express");
const app = express();
const bodyParser = require("body-parser");
const request = require("request");
const multer = require("multer");
const upload = multer();

// Map Steam name to Keybase username
const playerMapping = {
  "Steam Name 1": "keybase_username_1",
  "Steam Name 2": "keybase_username_2",
};

// Map Civilization game name to individual Keybase bots
const botMapping = {
  "Civilization Game 1": "https://KeybaseBotURL_1/",
  "Civilization Game 2": "https://KeybaseBotURL_2/",
};

// Make all the files in 'public' available
app.use(express.static("public"));
app.use(bodyParser.json());

// Send a message to a Keybase webhookbot endpoint
function sendMessage(botURL, content) {
  request(
    {
      uri: botURL,
      body: { msg: content },
      json: true,
      method: "POST",
    },
    function (error, response, body) {
      if (!error && response.statusCode == 200) {
        console.log(body);
      } else {
        console.log(response.statusCode);
        console.log(body);
      }
    }
  );
}

// Accept POST requests from Civilization VI
app.post("/", upload.array(), function (request, response) {
  var gameName = request.body.value1;
  var botURL = botMapping[gameName];
  var keybaseUsername = playerMapping[request.body.value2];
  var turnNumber = request.body.value3;

  if (keybaseUsername && botURL) {
    var message =
      "Hey @" +
      keybaseUsername +
      ", it's time to take turn " +
      turnNumber +
      " in '" +
      gameName +
      "'!";
    sendMessage(botURL, message);
    console.log("Done.");
  } else {
    console.log("Error: missing game or player\n" + request.body);
  }

  response.end();
});

// Listen for requests
var listener = app.listen(process.env.PORT, function () {
  console.log("App is listening on port " + listener.address().port);
});
Our Glitch server is now ready to handle requests. We just have to tell Civilization VI that this is where we want it to send our game information. We do this by going into the game options from the main menu and under the ‘Game’ tab configuring the two ‘Play By Cloud Webhook’ options:

The Webhook URL should be the URL to your Glitch project, which you can find by going to the Share button on Glitch and copying the Live App link. It will be in the format https://glitch-project-name.glitch.me. You also have the option to send a message on every turn, or only on your turn.
All that’s left now is to set up our Keybase bot.
Setting up Keybase #
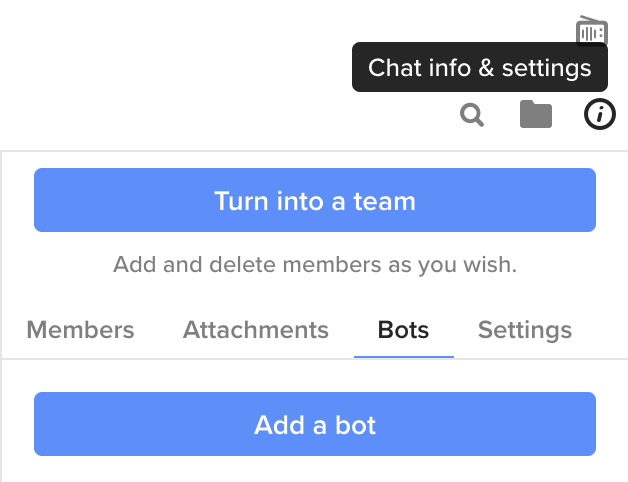
Keybase is the easy part of this process. In the Keybase desktop app, go into the chat channel that you’d like to receive your turn notifications in - it can be a chat with just yourself, another user, or a team channel. On the right side of the chat window, click the ‘i’ button to access the chat settings, go to the ‘Bots’ tab and click ‘Add a bot’.
You can then search for the Keybase Webhook bot or pick it from the list of featured bots. Just be sure to pick the one that’s by @keybase.

On the next screen you’ll be asked how you want to install the bot and you should keep the default ‘Restricted bot’ recommended setting before clicking ‘Review’ to continue. Then on the screen that confirms which messages can be read, leave both boxes checked and click ‘Install’.
If everything worked, the bot will post a message in the channel like this:

You’ll want to do what it suggests and create a webhook. The webhook will need a name but it can be anything you like. Send a message to the channel as follows:
!webhook create my-awesome-webhook
If everything went as planned, the webhook bot will then send you a private message which contains a URL to your new chat bot. It will look something like https://bots.keybase.io/webhookbot/[unique-id]. This bot expects a JSON object with a msg string that contains the message that we want to post… just like the one we set our Glitch project to send in the previous section! All we need to do now is copy this URL and paste it into the botMapping object in the Glitch project.
Go to Glitch and in the server.js file, modify botMapping so it now uses the URL webhookbot gave you:
// Map Civilization game name to individual Keybase bots
const botMapping = {
  "Player's Game": "https://bots.keybase.io/webhookbot/[unique-id]",
};
Double check that you’ve set the name of the game correctly too. This must match the name of the multiplayer game in Civilization VI (by default the name is ‘[Host’s Steam name’s] game’).
That’s everything done! Now when you take a turn in your multiplayer game, your should get a notification on Keybase from the webhookbot. If you don’t see any notifications, you can check the log on the Glitch project to see if there’s any errors and work back from there but hopefully this guide has given you a good overview of how the process works.
Happy conquering! ⚔️